


 By Dan Parkes (Director)
We have previously mentioned the importance of the director having a vision and being able to communicate this effectively (depending on his style of directing). But we must also not overlook some basic tools that all directors should use:
1. Blocking and shot selection
While 'blocking' is originally a theatre term this is equally important for film, as it involves not only the positioning of the actors within the frame but also the movement of the camera. This often first occurs during rehearsals when the director works with the actors to establish how they might stand or interact with each other. However this becomes far more critical on set, as the contraints of the location and props etc may dramatically affect the feasible logistics of the blocking. Not only that, but it will also be necessary for camera positions, lighting and focusing to know where each actor will stand, and in some cases these positions may be marked on the floor (hence the need for actors to 'hit their marks').
 Along with blocking is shot selection using different lenses (wide, medium and close up). A 'master shot' will often include all of the blocking as decided from one camera position, then allowing for filming of medium and close-ups later. Once the master has been shot the blocking cannot substantially change -otherwise it will affect the conintuity.
2. Eye-lines /180 degree rule.
Once the blocking has been decided and a master shot is about to filmed it is important to consider the actor's eyelines and future camera positions so as to not "cross the line". This is also known as the 180 degree rule. It can sound more complex than it really is, but is all about spacial relationships and continuity, so as not to confuse the viewer. Ulimately it means that the camera positions consistantly remain on one-side of the action (similar to a theatre audience). It is as if the scene has an imaginery axis, and if the camera was to suddenly pass over that axis it would disorientate the viewer. The end result should be that the actors have the same left/right relationship to each other.
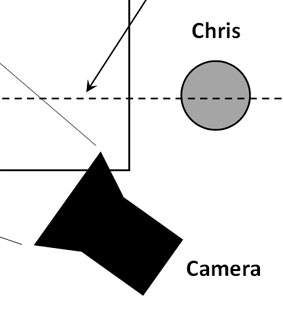
Take a look at this practical example from a scene in the 'Ambleton Delight' and notice how the camera stays on only one side of the invisible line between the two characters:
 A master shot of both John and Chris (28mm wide lens)
 A medium shot of John (50mm lens)
 A reverse medium shot of Chris (50mm lens)
Of course these above 'rules' are made to be broken if a conscious decision to do so, but if done accidentally will cause confusion and look amatuerish. In the case of crossing the line there are ways and means of getting the camera over the line if required, such as cutting to an image that is not spacially related to the action.
3. Takes
Stanley Kubrick apparantly holds the record for the most takes of a scene with 125 for the scene were Shelley Duvall climbs the stairs in The Shining.
 But while it can the mark of a perfectionist, a common trap any director can fall into is filming several takes out of 'habit'. In reality it is important to reflect on the purpose of another take, which should ultimately be due to improve on the previous one (or filming one for 'safety' if there was a possible issue). Before filming another a take a director can ask himself: What can I do to improve? What isn't working? Should we change the dialogue, the blocking? How about trying it faster or slower to provide pacing options in the edit? How about changing camera positions or framing?
 Note: It is also good for the director to reassure the actors the reason for another take -especially if it not due to an issue with their performance which they may assume if no reason is given and thus be waiting for direction. Too many takes without clear differences will only exasperate the cast and crew and waste valuable production time.


No comments:
Post a Comment